5 Essential Knife Skills Every Home Cook Should Master

The Claw Grip: Your Foundation for Safe Cutting
The Rock Chop: Efficient Herb and Garlic Mincing
The Julienne Cut: Creating Uniform Matchstick Vegetables
The Dice: Perfect Cubes for Even Cooking
The Chiffonade: Elegant Ribbons of Leafy Greens
What's the safest way to hold a knife and protect your fingers?
The claw grip keeps fingertips tucked and knuckles guiding the blade. Master this technique first—everything else builds on it.
Most home kitchen accidents happen because fingers wander into the blade's path. The claw grip eliminates that risk entirely. Tuck fingertips inward, curl them under, and let the knuckles of the guiding hand rest against the flat side of the blade. The knife slides up and down against the middle knuckle, never reaching the soft tissue beneath.
Here's the thing: professional chefs don't have faster reflexes. They've just eliminated opportunities for error. When the blade always contacts knuckle—not fingertip—cuts become physically impossible. Practice this with the Wüsthof Classic 8" Chef's Knife or any mid-weight German-style blade. The bolster (that metal collar between handle and blade) should rest comfortably against the guide knuckle.
Start slow. Hold an onion or carrot with fingertips curled completely under, thumb tucked behind fingers. The hand holding the food looks like a bear claw—that's the point. Slide the knife down, letting the flat side kiss the middle knuckle with each stroke. It feels awkward for about twenty minutes. Then muscle memory kicks in.
The catch? Many home cooks compromise with a "modified claw" where fingertips peek out. Don't. That modification costs emergency room visits. Full commitment to the claw grip means faster prep and intact fingers—period.
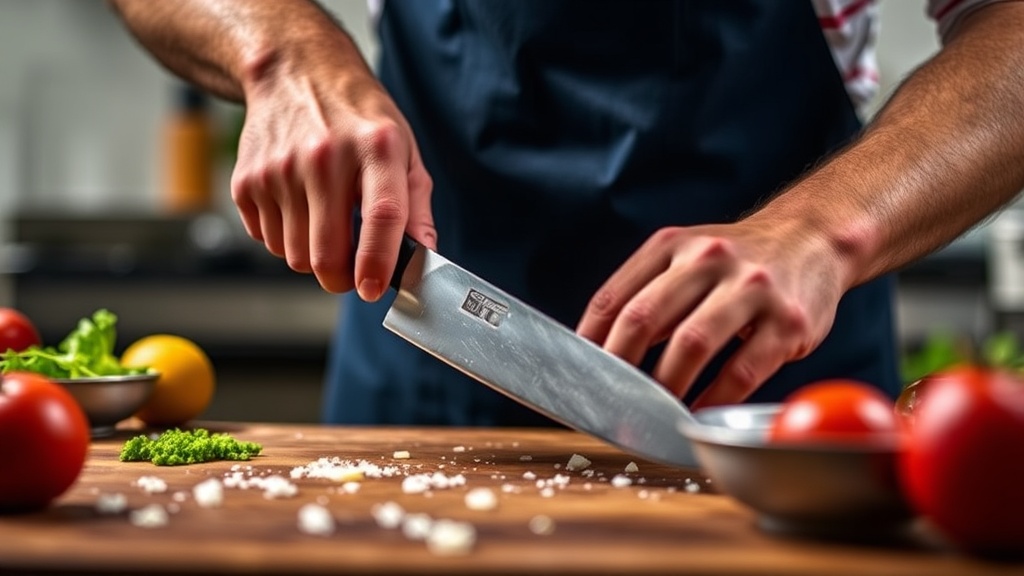
How do professional chefs chop vegetables so quickly?
They use the rock chop—a continuous blade motion that keeps the knife tip anchored to the board.
Watch a line cook work through a case of onions. The knife never leaves the cutting board. The tip stays planted while the heel lifts and falls in a smooth elliptical motion. This isn't showmanship—it's biomechanical efficiency. The wrist pivots, the forearm stabilizes, and the shoulder provides power. No wasted vertical motion, no repositioning the blade.
To practice: place the tip of a chef's knife on the board just forward of your ingredient. Keep it there. Lift the heel, slide the blade forward slightly, then pull back and down through the food. The motion resembles a rocking chair—hence the name. The blade travels forward and down, slices through, then resets.
That said, this technique demands a proper cutting board. Glass boards destroy edges. Bamboo looks pretty but tears fibers unevenly. The John Boos maple edge-grain board provides the right surface—soft enough to grip the blade tip, hard enough to resist scarring. A 20" x 15" board gives adequate real estate for the rocking motion.
Speed comes from consistency, not force. Each piece should sound identical as the blade passes through. If the rhythm breaks, the pieces vary in size. Professional kitchens demand uniformity because uneven pieces cook unevenly. Home cooks should demand it too—unless enjoying half-mushy, half-crunchy stir-fry appeals to you.
What's the difference between honing and sharpening a knife?
Honing realigns an existing edge; sharpening removes metal to create a new one. You need both, but at completely different intervals.
That distinction confuses nearly everyone. The steel rod hanging from most knife blocks? That's a hone, not a sharpener. It straightens the microscopic teeth along the blade's edge that bend during use. Those bent teeth still exist—they're just pointing sideways. A few passes on the steel coaxes them back into alignment.
Sharpening actually grinds metal away. Professional services use whetstones—Japanese water stones or Arkansas oil stones with grit ratings from 1000 (coarse) to 8000 (polishing). Electric sharpeners like the Chef'sChoice Trizor XV automate this with diamond abrasives. Either approach removes material to create a fresh bevel.
| Task | Tool | Frequency | What's Actually Happening |
|---|---|---|---|
| Honing | Steel rod or ceramic hone | Every 2-3 cooking sessions | Realigning microscopic edge teeth |
| Touch-up sharpening | 3000-5000 grit whetstone | Every 2-3 months (home use) | Light metal removal, edge refinement |
| Full sharpening | 1000 grit stone or professional service | Every 6-12 months | Removing chips, establishing new bevel |
Worth noting: ceramic "sharpening" rods actually remove trace metal. They're mini-sharpeners disguised as hones. Fine for maintaining an edge between proper sharpenings, but they don't replace whetstone sessions. And those pull-through carbide sharpeners? They chew through metal aggressively. Use them on a $15 supermarket knife, not on something that cost real money.
The Honing Technique That Actually Works
Hold the steel vertically, tip resting on a folded towel (prevents sliding). Place the blade heel against the top of the steel at approximately 15-20 degrees. That's roughly the width of a matchbook spine between spine and steel. Draw the knife down and toward you in one smooth arc, covering the full length. Alternate sides. Six passes per side, decreasing pressure on the final two strokes. Done correctly, it takes fifteen seconds.
Why do recipes specify cuts like "julienne" and "brunoise"?
Uniform cuts cook evenly and create consistent texture in the final dish. Learning the ladder of precision cuts separates competent cooks from ones who hack at ingredients.
French culinary tradition codified specific dimensions not to be pretentious, but because 1/8" difference in vegetable size translates to 2-3 minutes difference in cooking time. A julienne (matchstick cut, 1/8" × 1/8" × 2") and a brunoise (tiny dice, 1/8" cube) aren't just smaller versions of each other—they're related through technique.
Start with batonnet: rectangular sticks roughly 1/4" × 1/4" × 2-3". Square off a potato or carrot by trimming rounded edges, then cut planks. Stack planks, slice into sticks. These batonnets become julienne when halved crosswise, or small dice (macédoine) when turned 90 degrees and cut again.
The brunoise comes from turning julienne into cubes. It's tedious work that demands patience—and a sharp knife. A dull blade crushes rather than slices, leaving ragged edges that cook unevenly and look sloppy. Professional kitchens use brunoise for aromatic bases (mirepoix) in refined sauces where texture matters. Home cooks deploying this technique instantly upgrade their soup and stew presentations.
Here's the thing: nobody expects perfection on the first attempt. The goal is consistency within the batch, not micrometer precision. If every piece lands between 1/8" and 3/16", that's functional success. Practice on inexpensive vegetables—carrots, potatoes, turnips—before attempting brunoise on a $4 red bell pepper.
How do you break down a whole chicken without wasting meat?
Follow the anatomy—cut at joints, not through bone. A whole bird yields eight serving pieces plus carcass for stock.
Buying whole chickens saves money and builds real knife skills. Pre-cut pieces cost 40-60% more per pound, and you lose the backbone and wing tips that make excellent stock. The technique applies equally to ducks, turkeys, and game birds—once learned, it's universal.
Start with the bird breast-up. Pull a leg away from the body until the thigh joint pops audibly. Cut the skin between leg and breast, then follow with the knife, sliding along the carcass until the oyster (that tender oval of dark meat near the backbone) releases. Bend the leg backward to expose the joint connecting thigh and drumstick. Cut straight through—no force required.
For the breast: find the breastbone running center. Angle the knife along one side, keeping the blade tight against bone, and peel the breast away in one piece. Repeat opposite side. Trim wing tips (save for stock), then separate the flat wing joint if desired.
The entire process takes under three minutes with practice. Use a boning knife like the Victorinox Fibrox 6" boning knife—the flexible blade navigates curves better than a rigid chef's knife. The Fibrox line runs about $25, performs like knives costing five times more, and withstands abuse that would chip harder steel.
The carcass—backbone, wing tips, neck if included—goes into a freezer bag. Collect three or four, roast them until deeply browned, then simmer with aromatics for stock that destroys anything from a box. That's the final skill: respecting ingredients enough to use them completely. Good knife work isn't about speed or flash. It's about control, safety, and extracting maximum value from what enters the kitchen.